• Skip to primary navigation
  • Skip to main content
  • Skip to primary sidebar

William McCamment

Life Outside of Hell

  • Home
  • About
  • Contact

Blogging

Blogging Essentials — Google Analytics

September 21, 2017 By William McCamment

Welcome to the greatest non-productive activity in the history of blogging: Google Analytics.

I call it Google Analytics for two reasons: one, because that’s the official name, and two, because Google has rejected my repeated suggestions to change it to something much more honest, such as Blogger’s Time Toilet.

Anyway… you wouldn’t be here if you weren’t planning on adding this highly addictive, yet necessary tool to your blog, so let’s get on with it.

Google Analytics will let you see how many people are visiting your blog and where they came from. You’ll also have the ability to run all sorts of other important data which we’ll get into in another post. For now, we’re just going to focus on the installation.

In a previous post I explained how to setup Google Webmaster Tools. That’s kind of important if you plan on showing up in Google’s organic search results and improving your ranking, so if  you haven’t followed along with me on that one yet you should probably go do it before you continue.

Alright, there are several ways to install GA on your blog. You can either use one of the many WordPress plugins available, or do it the right way and simply paste some code on your site and be finished with it in 10-minutes.

I know there are a lot of highly respected bloggers and experts out there singing the praises of their favorite plugin, but I am here to go against all of them.

In my book, any time you can reduce unnecessary bulk and load time to the backend of your site the better. Not to mention every one of these plugins grant 3rd-party access to your data. Also, a lot of them are feeding ads into your statistics.

Look… I know it’s convenient to see your stats right on your WordPress dashboard, but they don’t give you the full picture anyway.

As you can imagine, I’ll only be covering the manual installation of Google Analytics in this post. If you want to go the plugin route, go try and sift through the complicated, authentication process for your chosen plugin.

OK, the first thing you’ll need to do is have an active Gmail account. I know, it sucks they make you do that, but if you want access to everything Google offers, it’s a requirement.

If you have that, then the next step is to actually sign-up for Google Analytics.

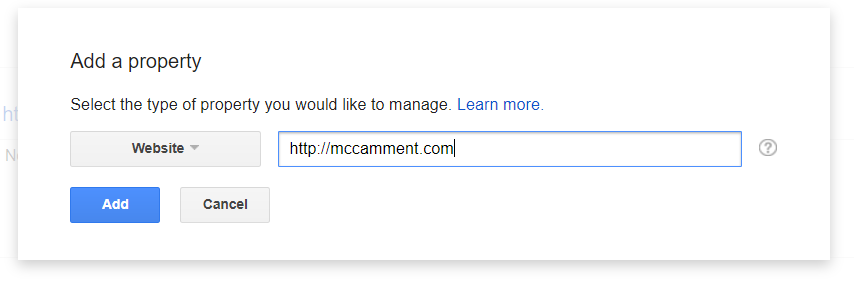
Next, they’re going to put you through some basic questions about your site. They’ll want you to give your site an account name (which is how you’ll identify this particular site in GA), the name of your website, the web address and whether or not it’s a website or a mobile app (hint: it’s a website).

Click on the Get Tracking I.D. button and accept the service agreement.

If you’ve got all that finished it’s time to simply grab the code and paste it into your blog.

Since I use the Genesis Framework for my theme I have easy access to header and footer code placement (it’s at the bottom of the Genesis theme settings). If you’re not using a theme with that support, it’s a simple matter of downloading and installing the Insert Headers and Footers plugin.

Note that this is NOT one of the bulky, intrusive, GA plugins I mentioned before, this is a simple, light-weight plugin that won’t bog down your site one bit. All it does is make it easy for you to place code in the header and footer, and that’s what you’ll need to do to get Google Analytics to work.

Are you still with me? Good.

So, copy the code supplied by Google Analytics in the first box. Ignore everything else, it’s just there to confuse you.

Now, get into the backend of your WordPress site and paste that code into your “Header” box. You’ll find that in either the Genesis theme settings (if you’re using Genesis) or if you’re using the Headers and Footers plugin you’ll need to find the link in the left-hand sidebar.

Obviously, if you’re using some other theme supporting code placement, go there instead.

Click “save” and you’re done.

All that’s left now is to log into Google Analytics and check to make sure it’s recording your site’s visits.

Open another browser tab and go to your website then click back on the GA tab in your browser and take a look.

If everything is set, you should be able to click on Real-Time >> Overview and it should indicate the number of visitors on your site (which should be any number other than zero).

If you don’t see anyone there, make sure you’re actually on your site in another tab.

Well, that’s all there really is to installing Google Analytics on your site.

Good luck!

Filed Under: Blogging Tagged With: blogging, blogging essentials, blogging stats, google analytics

Blogging Essentials — Google Webmaster Tools

September 19, 2017 By William McCamment

One of the first things I like to do with a brand new WordPress site is setup Google Webmaster Tools.

This will give me access to the Google Search Console and allow me to monitor and maintain my position in the Google search results.

If you’re one of those people who set up a blog years ago but wonder why you don’t get any love from the search engines, this could definitely help you to find some answers.

If you’re about to setup a brand new blog, congratulations for finding this post, it could really get you off to a great start.

This isn’t necessarily the first step in setting up a new blog; there are plenty of other things you should do first (like knowing WHY you’re blogging in the first place), but I’ll be covering all that in a future step-by-step series.

Right now, this is where I’m at with THIS blog, so in the name of documenting my progress, here it is.

Where I’m at so far with the technical side…

  • I’ve got my domain name and hosting
  • I’ve manually installed WordPress (Using an “automatic” installer for WordPress is a bad idea–more about that in a future post).
  • I’ve chosen my theme (Genesis framework with the Metro Pro child theme)
  • I’ve arranged my layout
  • I’ve setup my categories properly (blog post coming)
  • I’ve installed the essential plugins (blog post coming)
  • I’ve setup my comments mechanism and tested it out (I went with Disqus this time — that’s a first for me)
  • I’ve written a few blog posts to make sure everything works

Now it’s time to get the back end lined up properly. I mentioned in a previous post that I’m not going to worry too much about search engine optimization aside from basic WordPress SEO.

Well, this is part of that basic WordPress SEO.

Setting Up Google Webmaster Tools

So, before I begin setting up Webmaster Tools I made sure I have the Google XML Sitemaps plugin installed.

Google Webmaster Tools setup is going to make you install it anyway, so instead of having to jump back and forth between your blog, the WordPress plugins page and GWT, just save yourself some stress and pre-install it.

I’m not going to worry about the sitemap settings for now… the default settings are good enough. I’ll tinker with that stuff later.

OK, time to go to login to Google Webmaster Tools and get things rolling. You can get there by following the link below:

https://www.google.com/webmasters/

I already have an account, so that part is done.

Next, click the big red “Add a Property” button in the upper right-hand side then fill out the form with your full web address like so:


That will take you to a screen with instructions on verifying your website.

GWT will then have you download a file to upload to your site. The only purpose of this file is to verify you have access to the backend of your blog and therefore are the legit owner or administrator.

You could also be a hacker who’s gained illegal access, but if that’s the case, why are you concerned so much about the Google Search Console?

Anyway… you’ll want to put the verification file into the Public_html folder. There are a couple ways to get it in there; you can either use the file access through your hosting’s control panel (my hosting company uses CPanel), or use a standalone FTP app.

If you’re using CPanel, here’s how to upload a file.

I use FileZilla and just navigate to the Public_html folder and then drag the file in there from my desktop.

OK, once we get the file in there click the link to make sure it was uploaded correctly (if you got everything right, it’ll just show the file name).

Then tick the “I’m not a Robot” box and verify your website.

If everything’s cool you should get a notification like this:

Now click the little blue “continue” link and you’ll be taken to your dashboard.

The first thing you should do is look for any security issues especially if you’re doing this on an older site.

Go along the left-hand sidebar and click the Security Issues link.

If there are any issues they will show up there. If you have some, you’re going to want to take care of them as soon as possible.

Mine came up clean, so I can move on.

My site is new, so there aren’t any crawl errors or search analytics to look at.

Right now, Webmaster Tools doesn’t know I have a sitemap, so I need to click the Sitemap tab and then the ADD/TEST SITEMAP button:

Give it the address of your sitemap. If you followed my advice and pre-installed the Google XML Sitemaps plugin, it will look something like this (but with your domain, of course):

Since I have pre-installed the XML Sitemaps plugin, I can skip the “submit” and go straight to “test.”

If you have success, click the “view results” button and make sure there are no errors.

All good? Good!

If you’re NOT good (meaning you’ve got errors), you’ll have to look up how to fix them. There’s just way too many possibilities for me to list everything here. Besides, I take each error as it comes up and I’m definitely no expert in that sort of thing.

Now… there’s one more thing we have to do before we’re done. It seems Google thinks you have TWO websites!

You have the “www” version and the “non-www” version. So, the next step is to get back to your Google Search Console dashboard and click the little gear icon in the upper right-hand side.

Choose “Site Settings” and you’ll be taken to a screen where you choose your preferred domain. It will look something like this:

In my case, it’s easy to choose; I just open up a new browser tab, type in my web address with the “www” and see if it redirects to the other version. In my case it did, so my preferred domain is going to be the default domain (which has no “www”).

If you tried this and it DIDN’T change, you should check the other version and see if THAT one redirects. If it doesn’t, then either go into your domain registrar and find out how to redirect to your preferred version (this should’ve already been done when you registered and setup your domain name, but just in case it hasn’t, there’s where you’ll fix that).

The reason you want to have everything redirect to a single version of your domain is because, as I said, Google treats each version as a separate website and when someone links to your site, only the linked version gets the juice.

Anyway, once you’ve figured out which version to use, tick the appropriate radio button and click “save.”

Congratulations! You’ve setup your Google Webmaster Tools console!

We will go through all the cool things you can do with this in future blog posts (such as how to improve your search engine rankings).

Right now we have to wait for Google to start processing our site–there’s no data to look at yet–so just make sure you’re clear on the errors.

In the next Blogging Essentials post, we’ll setup Google Analytics.

Hope you found this post useful. If so, share it with your friends.

Filed Under: Blogging Tagged With: blogging, blogging essentials, google, google ranking, google search console, google webmaster tools, search engine optimization, seo

Pulling Down My Pants and Showing Everything

September 17, 2017 By William McCamment

Don’t worry, I’m not going to actually “pull down my pants” and show you the cruel photographs.

But, I am going to expose something even more frightening.

According to an article in Psychology Today, Dr. Glenn Croston explains why the majority of people would literally rather die than face public humiliation.

It turns out human beings have that unfortunate trait hard-wired into their brains.

It’s a primitive survival mechanism…

When early humans stood up in front of their tribe and grunted unacceptable dialog, they were often kicked out and forced to face large predators and starvation without protection from the group.

The cave-dweller who knew how to keep his mouth shut had a much better chance of survival and was therefore more likely to pass this trait on to his offspring.

But, lucky for us, that fear-trait can be channeled into the greatest productivity tool ever invented…


The Public Humiliation Technique for Getting Things Done

Considering the above, it only stands to reason that one of the most effective ways to guarantee you’ll follow through with a project (such as setting up, scheduling and maintaining a blog)  is to announce it to the public.

Either you deliver your project on-time as promised or face public humiliation (which, as we just discussed, is only slightly less terrifying than being thrown into a pit of velociraptors).

So, to fully demonstrate this technique, I will not only promise to update this blog every day (or face public humiliation), but to prove my unmatched fearlessness, I’m also going to let everyone see this blog in all its naked glory.

For example:

I haven’t filled out the “About” page…

There’s nothing on the “Contact” page…

My sidebar displays nothing but a place-holder…

The are only two blog posts: this one, and one explaining how the initial premise of this blog is the stupidest idea in the history of blogging.

Now… if you’re seeing this post much after Sept 17, 2017, you might not see anything too embarrassing (and, a lot of the things I mentioned above are already resolved), so you should probably go on to the next post. It’s probably a good one.

So, what do you think of all this?

Do you have the courage to use the Public Humiliation technique?

Let me know in the comment section below.

Or, just humiliate me… whatever.

Seriously, fire away, Captain. I need to test the new comments mechanism.

Filed Under: Blogging Tagged With: blogging, wordpress

The Stupidest Idea in the History of Blogging

September 13, 2017 By William McCamment

In the March 1957 issue of Detective Comics, Batman shows up to a rifle sharpshooter’s competition wearing an all-white bat costume with a large black target printed across his chest.

And, guess what…

He gets shot.

Now, look… I’m as much a Batman fan as the next guy, but wearing a bullseye on your chest at a rifle competition is clearly a stupid idea.

In fact, it’s so stupid I’m wondering if whoever storyboarded that issue wasn’t the victim of the old, “Let’s put LSD in his coffee,” prank.

But, now, I’m about to do something just as stupid. And, although I can’t swear to it, I’m pretty sure there are no hallucinogenic drugs in my coffee.

I’m starting a new blog—the very blog you’re reading right now—without hardly paying attention to conventional wisdom.

For example, the domain name is MCCAMMENT.COM which has got be the dumbest domain name idea since BREITBART.COM.

Both are extremely hard to get right unless someone spells it out for you.

And, although I could never in my wildest dreams match Breitbart for stupid content, I’m not claiming my content will be stupid, only that the overall premise for this blog is stupid.

Also, the name of this website is “William McCamment.” Who names the blog after themselves? No one, of course. It’s stupid

No one is ever going to run a Google search for that unless they think I owe them money or something.

My tagline is: Life Outside of Hell.

Still, no real clue as to what this blog is about.

Finally, when you get to my tagline’s tagline there’s a bit of something you can chew…

“Rejecting Society’s Acceptable Guidelines”

Unfortunately, that line only appears in the header image so it’s pretty much useless from an SEO standpoint. There’s no place for a “Tagline’s Tagline” in WordPress’ settings; and even if there were, it’s still too broad a topic to give any meaningful insight.

And, so far we’ve only covered the blog title! Here are some other blogging violations I’m guilty of:

  1. Aside from basic WordPress SEO setup, I’m not ever going to worry about my ranking in the search engines. If I absolutely need traffic for some reason, I’ll just buy it.
  2. I’m not going to worry too much about a clearly defined audience. If you’re going to start a blog or website, please don’t ignore this important step as I have… make sure you know your audience and consider them in everything you do. Ignoring this is… well… just plain stupid.
  3. This blog will completely lack focus. It will be a hodgepodge of writing ideas, blogging advice, marketing advice, copywriting advice, ranting, humor and life. There’s a chance some of my readers will enjoy it or get something out if it, but please don’t emulate this idea if you want any sort of following aside from crickets.
  4. I’ll be writing mostly for the enjoyment of writing. I don’t care if you like what I’m writing or not. I’ll always be truthful and give only sound advice when I give it, but if you don’t agree with it or want to follow it… I don’t care.
  5. I will only cover topics I find interesting. This blog will not be hard work. It’s going to be fun. Again, if you want a following, you should cover topics of interest to your audience, not you!

Now… having preemptively confessed of these sins, I want you to know I haven’t abandoned my potential readers completely… I do have one rule I will rigidly stand by throughout the life of this blog:

I WILL NOT BE BORING

Filed Under: Blogging, Writing Tagged With: blogging, seo, stupidity, writing

Primary Sidebar

William McCamment is 50% Hippy, 50% Hillbilly, and 50% Undiscovered Cultural Icon (also, apparently, 50% bad at math). He is an Author, Renegade Philosopher, and Notorious Raconteur. And, even though his wife is frequently seen in the background rolling her eyes—like she’s doing right now—he can often appear charming and well-mannered.

William lives in Temecula, CA with his beautiful wife, two spoiled daughters, and a surprising list of crazy animals.

Disclaimer | Privacy Policy | Terms of Service | Support

Copyright © 2017. William McCamment