One of the first things I like to do with a brand new WordPress site is setup Google Webmaster Tools.
This will give me access to the Google Search Console and allow me to monitor and maintain my position in the Google search results.
If you’re one of those people who set up a blog years ago but wonder why you don’t get any love from the search engines, this could definitely help you to find some answers.
If you’re about to setup a brand new blog, congratulations for finding this post, it could really get you off to a great start.
This isn’t necessarily the first step in setting up a new blog; there are plenty of other things you should do first (like knowing WHY you’re blogging in the first place), but I’ll be covering all that in a future step-by-step series.
Right now, this is where I’m at with THIS blog, so in the name of documenting my progress, here it is.
Where I’m at so far with the technical side…
- I’ve got my domain name and hosting
- I’ve manually installed WordPress (Using an “automatic” installer for WordPress is a bad idea–more about that in a future post).
- I’ve chosen my theme (Genesis framework with the Metro Pro child theme)
- I’ve arranged my layout
- I’ve setup my categories properly (blog post coming)
- I’ve installed the essential plugins (blog post coming)
- I’ve setup my comments mechanism and tested it out (I went with Disqus this time — that’s a first for me)
- I’ve written a few blog posts to make sure everything works
Now it’s time to get the back end lined up properly. I mentioned in a previous post that I’m not going to worry too much about search engine optimization aside from basic WordPress SEO.
Well, this is part of that basic WordPress SEO.
Setting Up Google Webmaster Tools
So, before I begin setting up Webmaster Tools I made sure I have the Google XML Sitemaps plugin installed.
Google Webmaster Tools setup is going to make you install it anyway, so instead of having to jump back and forth between your blog, the WordPress plugins page and GWT, just save yourself some stress and pre-install it.
I’m not going to worry about the sitemap settings for now… the default settings are good enough. I’ll tinker with that stuff later.
OK, time to go to login to Google Webmaster Tools and get things rolling. You can get there by following the link below:
https://www.google.com/webmasters/
I already have an account, so that part is done.
Next, click the big red “Add a Property” button in the upper right-hand side then fill out the form with your full web address like so:

That will take you to a screen with instructions on verifying your website.
GWT will then have you download a file to upload to your site. The only purpose of this file is to verify you have access to the backend of your blog and therefore are the legit owner or administrator.
You could also be a hacker who’s gained illegal access, but if that’s the case, why are you concerned so much about the Google Search Console?
Anyway… you’ll want to put the verification file into the Public_html folder. There are a couple ways to get it in there; you can either use the file access through your hosting’s control panel (my hosting company uses CPanel), or use a standalone FTP app.
If you’re using CPanel, here’s how to upload a file.
I use FileZilla and just navigate to the Public_html folder and then drag the file in there from my desktop.
OK, once we get the file in there click the link to make sure it was uploaded correctly (if you got everything right, it’ll just show the file name).
Then tick the “I’m not a Robot” box and verify your website.
If everything’s cool you should get a notification like this:

Now click the little blue “continue” link and you’ll be taken to your dashboard.
The first thing you should do is look for any security issues especially if you’re doing this on an older site.
Go along the left-hand sidebar and click the Security Issues link.
If there are any issues they will show up there. If you have some, you’re going to want to take care of them as soon as possible.
Mine came up clean, so I can move on.
My site is new, so there aren’t any crawl errors or search analytics to look at.
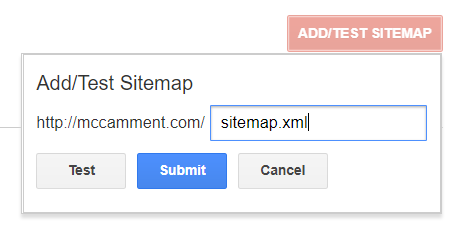
Right now, Webmaster Tools doesn’t know I have a sitemap, so I need to click the Sitemap tab and then the ADD/TEST SITEMAP button:

Give it the address of your sitemap. If you followed my advice and pre-installed the Google XML Sitemaps plugin, it will look something like this (but with your domain, of course):

Since I have pre-installed the XML Sitemaps plugin, I can skip the “submit” and go straight to “test.”
If you have success, click the “view results” button and make sure there are no errors.
All good? Good!
If you’re NOT good (meaning you’ve got errors), you’ll have to look up how to fix them. There’s just way too many possibilities for me to list everything here. Besides, I take each error as it comes up and I’m definitely no expert in that sort of thing.
Now… there’s one more thing we have to do before we’re done. It seems Google thinks you have TWO websites!
You have the “www” version and the “non-www” version. So, the next step is to get back to your Google Search Console dashboard and click the little gear icon in the upper right-hand side.
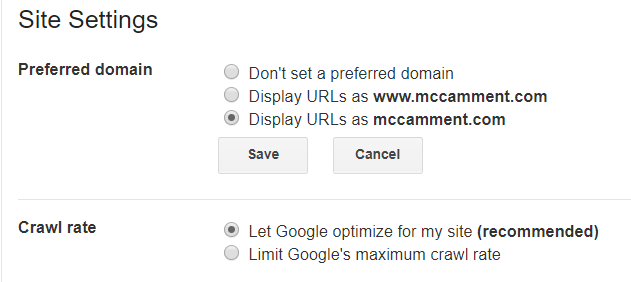
Choose “Site Settings” and you’ll be taken to a screen where you choose your preferred domain. It will look something like this:

In my case, it’s easy to choose; I just open up a new browser tab, type in my web address with the “www” and see if it redirects to the other version. In my case it did, so my preferred domain is going to be the default domain (which has no “www”).
If you tried this and it DIDN’T change, you should check the other version and see if THAT one redirects. If it doesn’t, then either go into your domain registrar and find out how to redirect to your preferred version (this should’ve already been done when you registered and setup your domain name, but just in case it hasn’t, there’s where you’ll fix that).
The reason you want to have everything redirect to a single version of your domain is because, as I said, Google treats each version as a separate website and when someone links to your site, only the linked version gets the juice.
Anyway, once you’ve figured out which version to use, tick the appropriate radio button and click “save.”
Congratulations! You’ve setup your Google Webmaster Tools console!
We will go through all the cool things you can do with this in future blog posts (such as how to improve your search engine rankings).
Right now we have to wait for Google to start processing our site–there’s no data to look at yet–so just make sure you’re clear on the errors.
In the next Blogging Essentials post, we’ll setup Google Analytics.
Hope you found this post useful. If so, share it with your friends.